


I format fiction documents using specific paragraph and heading styles. Rather than formatting each paragraph and chapter heading individually, I use Microsoft Word styles to apply a standard format to all paragraphs and chapter headings. Much of the formatting I apply to my fiction documents deals with how document elements will look when displayed in PDF and print formats, since publication in e-book format discards most document formatting.
When writing fiction, I like to use Times New Roman font. I display chapter titles large and bold on a new page and delimit paragraphs using a newline and 0.3 inch indent. For comparison, I format nonfiction differently, configuring Microsoft Word heading styles to number chapter headings and left align paragraphs using a blank line instead of an indent to delimit paragraphs.
In this post, I explain how to configure the Microsoft Word Normal paragraph style to indent new paragraphs when you press return and to configure the heading style to display chapter headings using bold text and begin them each on a new page.
Automatically Indenting Fiction Paragraphs
Microsoft Word automatically wraps text at the right margin of the page. The only time you should ever press return is to insert a new paragraph, chapter heading or scene separator. The rest of the time, simply type and let Microsoft Word wrap your text for you.
Separate paragraphs with a newline by pressing return.
Beforehand, you must configure Microsoft Word to indent paragraphs 0.3 inches. This indentation will distinguish the start of each paragraph. Here’s a step-by-step guide to configuring paragraphs to indent in Microsoft Word.
- Click the Home menu tab to display the menu ribbon.
- Right-click over the Normal tab in the Styles section of the ribbon.
- Select Modify from the context menu to display the Modify Style dialog box.

- Configure your Normal style to use the font Time New Roman, size 12 pt, no bold, italic or underscore, using the Automatic color (black) and left justification.

- Click the Format button in the lower left corner of the Modify Style dialog box.
- Select Paragraph from the drop-down menu.

- Set Special indentation First line and By to 0.3″.
- Set Spacing to 0 pt both before and after each paragraph.
- Click the OK button to save your settings.
- Click the OK button on the Modify Style dialog box to save all settings.


After you perform these actions, Microsoft Word will begin indenting paragraphs for you when you press return.
Starting Chapter Headings on New Pages
Next, you’ll perform a similar operation to configure chapter headings to be bold and to begin on a new page.
- Click the Home menu tab to display the menu ribbon.
- Right-click over the Heading 1 tab in the Styles section of the ribbon.
- Select Modify from the context menu to display the Modify Style dialog box, this time for the Heading 1 style we’ll use for chapter headings.
- Configure your Heading 1 style to use the font Times New Roman, make the size 14 pt, just a little larger than the Normal font, and make the heading bold.
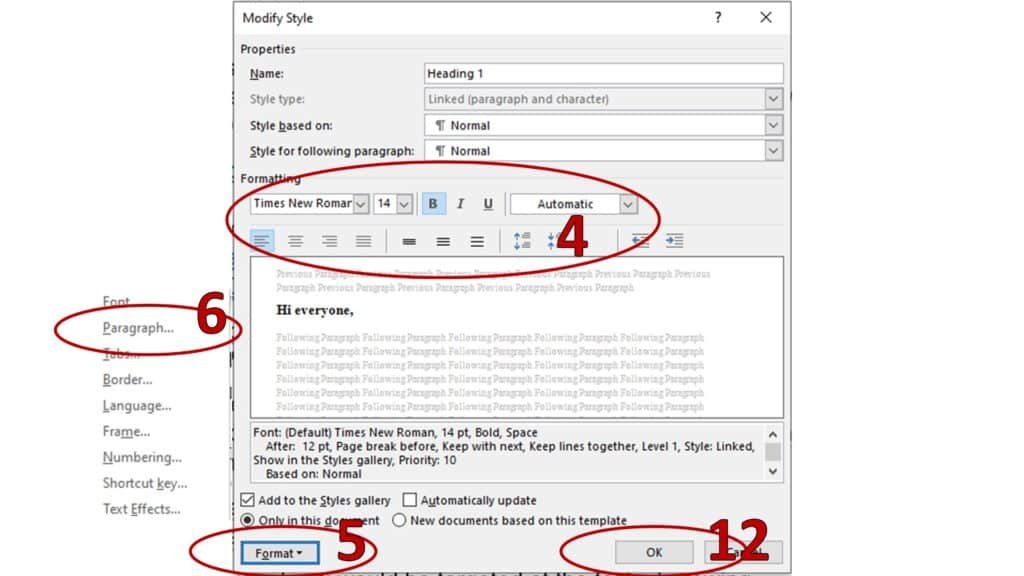
- Click the Format button in the bottom left corner of the Modify Style dialog box.
- Select Paragraph from the drop-down menu.

- Set Special indentation to None since we don’t want chapter headings indented.
- Set Spacing to 0 pt before and 12 pt after each chapter heading.
- Click the Line and Page Breaks tab at the top of the Paragraph dialog box.
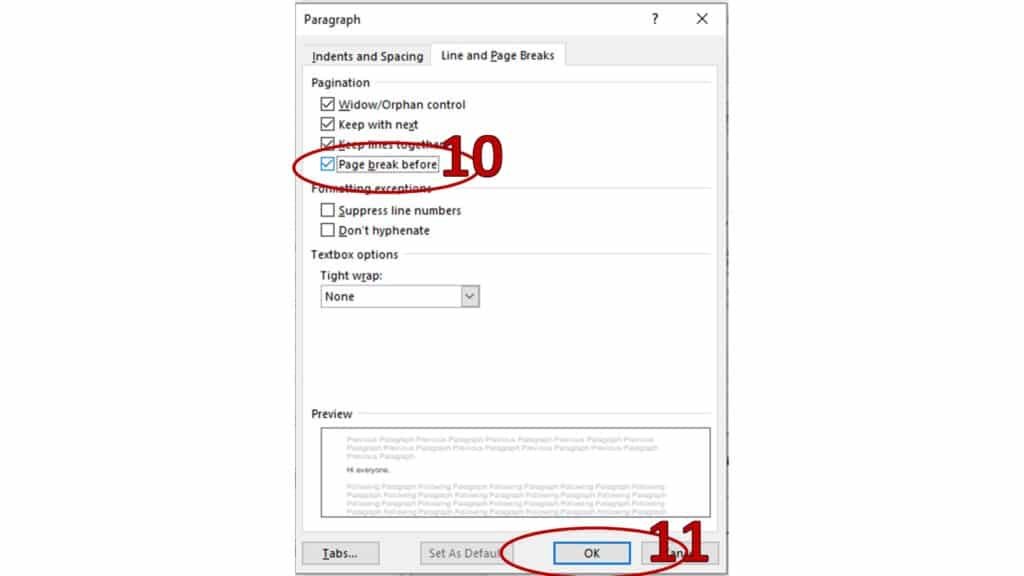
- Check the Page break before checkbox to for a page break before each chapter heading.
- Click the OK button to save your settings.
- Click the OK button on the Modify Style dialog box to save all settings.


After performing these actions, you need only position the cursor on a line and select Heading 1 from the Style menu ribbon to create a chapter heading.
I hope this helps and I’ll see you in the classroom,
—Brian


